JavaScript Object-Oriented Programming (OOP) – Complete Guide with Objects, Classes, Constructors, Encapsulation, Inheritance, Polymorphism, Abstraction, Modules, and Practical Projects (2026)
Prerequisites
Before starting this tutorial, readers should have a basic understanding of:
- HTML5
- CSS3
- JavaScript Fundamentals
- Variables and Data Types
- Functions
- Arrays
- Objects
- DOM Manipulation
- ES6 Features
- Error Handling
Learning Objectives
After completing this tutorial, you will be able to:
- Explain Object-Oriented Programming concepts.
- Create JavaScript objects using different techniques.
- Build reusable classes.
- Work with constructors.
- Understand object properties and methods.
- Apply Encapsulation, Inheritance, Polymorphism, and Abstraction.
- Create reusable JavaScript modules.
- Build real-world applications using OOP principles.
Introduction
Modern software applications often consist of thousands or even millions of lines of code. Managing such large applications becomes difficult if the code is not properly organized.
Object-Oriented Programming (OOP) is a programming paradigm that organizes software around objects rather than functions or procedures. An object represents a real-world entity that combines data (properties) and behavior (methods) into a single unit.
JavaScript initially supported object-based programming through prototypes. With the introduction of ECMAScript 2015 (ES6), JavaScript introduced the class syntax, making Object-Oriented Programming easier to understand and write.
Today, almost every modern JavaScript framework and library—including React, Angular, Vue.js, and Node.js—makes extensive use of OOP concepts.
Why Learn Object-Oriented Programming?
As applications grow larger, maintaining hundreds of independent functions becomes increasingly difficult.
Consider a Student Management System.
Without OOP, you might create separate functions such as:
createStudent()

updateStudent()

deleteStudent()

displayStudent()

calculateResult()

generateReport()With Object-Oriented Programming, everything related to a student is grouped together inside a Student object.
Student
│
├── Name
├── Roll Number
├── Course
├── Marks
├── Attendance
│
├── calculateGrade()
├── displayDetails()
├── updateRecord()
└── generateReport()Real-World Examples of OOP
Many real-world entities can be represented as objects.
| Real-World Entity | Properties | Methods |
|---|---|---|
| Student | Name, Roll No, Marks | Study(), AttendClass(), ViewResult() |
| Car | Brand, Model, Color | Start(), Stop(), Brake() |
| Bank Account | Account No, Balance | Deposit(), Withdraw(), Transfer() |
| Employee | Name, Salary, Department | Work(), CalculateSalary() |
| Mobile Phone | Brand, RAM, Storage | Call(), Message(), Camera() |
In JavaScript, these real-world entities are modeled as objects.
What is Object-Oriented Programming?
Object-Oriented Programming (OOP) is a programming methodology that represents software as a collection of objects.
Each object contains:
- Data (Properties)
- Functions (Methods)
An object represents a real-world entity capable of storing information and performing operations.
Characteristics of OOP
Object-Oriented Programming is based on four fundamental principles:
- Encapsulation
- Inheritance
- Polymorphism
- Abstraction
These principles make software:
- Reusable
- Modular
- Secure
- Easy to Maintain
- Scalable
Each concept will be discussed in detail later in this tutorial.
Procedural Programming vs Object-Oriented Programming
Before learning OOP, it is important to understand how it differs from Procedural Programming.
Procedural Programming
Procedural programming focuses on writing sequences of instructions or functions.
Example:
createStudent();

calculateMarks();

displayResult();Object-Oriented Programming
Object-Oriented Programming groups related data and functions together.
Example:
student.calculateMarks();

student.displayResult();Comparison: Procedural Programming vs OOP
| Procedural Programming | Object-Oriented Programming |
|---|---|
| Focuses on functions | Focuses on objects |
| Data is separate | Data and methods are combined |
| Less reusable | Highly reusable |
| Difficult to maintain | Easy to maintain |
| Less secure | Better data protection |
| Suitable for small programs | Suitable for large applications |
Advantages of Object-Oriented Programming
Code Reusability
Classes can be reused to create multiple objects.
Better Organization
Related data and methods remain together.
Improved Security
Encapsulation prevents unauthorized access to data.
Easier Maintenance
Changes made in one class automatically benefit all objects created from it.
Scalability
OOP is suitable for enterprise-level applications.
Disadvantages of OOP
Although OOP offers many advantages, it also has some limitations.
Increased Complexity
Small applications may not require OOP.
Slightly Higher Memory Usage
Objects occupy memory.
Learning Curve
Understanding inheritance and polymorphism takes practice.
What is an Object?
An Object is a collection of related data and functions.
For example, a student object may contain:
Student

│

├── Name

├── Roll Number

├── Department

├── Marks

│

├── Study()

├── Display()

└── CalculateGrade()Object Terminology
| Term | Description |
|---|---|
| Object | Real-world entity |
| Property | Data stored inside an object |
| Method | Function inside an object |
| Class | Blueprint for creating objects |
| Instance | An object created from a class |
What is a Property?
A property stores information about an object.
Example:
const student = {

name:"Akshay",

rollNo:101,

department:"Computer Science"

};namerollNodepartment
are object properties.
What is a Method?
A method is a function stored inside an object.
Example:
const student = {

name:"Akshay",

display:function(){

console.log(this.name);

}

};

student.display();AkshayObject Structure
Object

│

├── Properties

│      │

│      ├── Name

│      ├── Age

│      └── Course

│

└── Methods

       │

       ├── Display()

       ├── Update()

       └── Delete()
How Objects Work
Create Object

        │

        ▼

Store Properties

        │

        ▼

Define Methods

        │

        ▼

Access Properties

        │

        ▼

Call Methods
Why Are Objects Important?
Without objects:
let studentName="Akshay";

let studentRoll=101;

let studentDepartment="CS";With objects:
const student={

name:"Akshay",

rollNo:101,

department:"CS"

};Creating Objects in JavaScript
JavaScript provides multiple ways to create objects. Depending on the size and complexity of an application, developers can choose the most suitable approach.
The most commonly used methods are:
- Object Literal
- Using the
new Object()Constructor - Constructor Functions
- ES6 Classes
- Using
Object.create()
As you progress through this tutorial, you will learn each of these methods in detail.
Method 1: Creating Objects Using Object Literals
What is an Object Literal?
An Object Literal is the simplest and most commonly used way to create an object in JavaScript.
An object literal consists of a collection of key-value pairs enclosed within curly braces {}.
Syntax
const objectName = {

    property1 : value,

    property2 : value,

    methodName : function(){

    }

};
Example 1: Student Object
const student = {

    name: "Akshay",

    rollNumber: 101,

    department: "Computer Science",

    age: 22

};

console.log(student);{
name: "Akshay",
rollNumber: 101,
department: "Computer Science",
age: 22
}Explanation
The object contains four properties:
namerollNumberdepartmentage
Each property stores information about the student.
Example 2: Car Object
const car = {

    brand: "Toyota",

    model: "Innova",

    color: "White",

    price: 2500000

};

console.log(car);{
brand: "Toyota",
model: "Innova",
color: "White",
price: 2500000
}Example 3: Mobile Object
const mobile = {

    brand: "Samsung",

    model: "Galaxy S24",

    ram: "8 GB",

    storage: "256 GB"

};

console.log(mobile);{
brand: "Samsung",
model: "Galaxy S24",
ram: "8 GB",
storage: "256 GB"
}Accessing Object Properties
Once an object has been created, its properties can be accessed in different ways.
JavaScript provides two methods:
- Dot Notation
- Bracket Notation
Dot Notation
Dot notation is the simplest and most commonly used method.
Syntax
objectName.propertyNameExample
const student = {

    name: "Akshay",

    age: 22

};

console.log(student.name);

console.log(student.age);Akshay
22Explanation
JavaScript retrieves the values associated with the specified properties.
Bracket Notation
Bracket notation is useful when:
- Property names contain spaces
- Property names are stored inside variables
- Property names are dynamic
Syntax
objectName["propertyName"]Example
const student = {

    name: "Akshay",

    age: 22

};

console.log(student["name"]);

console.log(student["age"]);Akshay
22Example Using Variables
const student = {

    name: "Akshay",

    department: "Computer Science"

};

let property = "department";

console.log(student[property]);Computer ScienceDot Notation vs Bracket Notation
| Dot Notation | Bracket Notation |
|---|---|
| Easy to read | Useful for dynamic properties |
| Faster to write | Allows variables as property names |
| Cannot access properties with spaces | Supports properties containing spaces |
| Preferred in most cases | Used when required |
Adding New Properties
Objects are dynamic.
New properties can be added even after object creation.
Example
const student = {

    name: "Akshay"

};

student.age = 22;

student.city = "Sangli";

console.log(student);{
name: "Akshay",
age: 22,
city: "Sangli"
}Updating Properties
Existing properties can be modified.
Example
const student = {

    name: "Akshay",

    age: 22

};

student.age = 23;

console.log(student);{
name: "Akshay",
age: 23
}Deleting Properties
JavaScript provides the delete operator.
Syntax
delete object.property;Example
const student = {

    name: "Akshay",

    age: 22,

    city: "Sangli"

};

delete student.city;

console.log(student);{
name: "Akshay",
age: 22
}Object Methods
Objects can store functions.
Functions inside objects are known as Methods.
Syntax
const objectName = {

    methodName(){

    }

};
Example 1
const student = {

    name: "Akshay",

    display(){

        console.log("Welcome");

    }

};

student.display();WelcomeExample 2
const calculator = {

    add(a,b){

        return a+b;

    }

};

console.log(calculator.add(20,10));30Example 3
const employee = {

    name: "Rahul",

    salary: 60000,

    display(){

        console.log(this.name);

        console.log(this.salary);

    }

};

employee.display();Rahul
60000The this Keyword
What is this?
The this keyword refers to the current object that is executing the method.
It allows object methods to access their own properties without explicitly referencing the object’s name.
Why Use this?
Without this, methods would need to reference the object name directly. If the object name changes, the code would also need to be updated.
Using this makes methods reusable and independent of the object’s variable name.
Syntax
this.propertyNameExample 1
const student = {

    name: "Akshay",

    display(){

        console.log(this.name);

    }

};

student.display();AkshayExample 2
const employee = {

    name: "Rahul",

    department: "IT",

    display(){

        console.log("Employee :", this.name);

        console.log("Department :", this.department);

    }

};

employee.display();Employee : Rahul
Department : ITExample 3
const bankAccount = {

    accountHolder: "Akshay",

    balance: 50000,

    deposit(amount){

        this.balance += amount;

        console.log("Updated Balance :", this.balance);

    }

};

bankAccount.deposit(5000);Updated Balance : 55000Nested Objects
Objects can contain other objects.
This is known as Nested Objects.
Example
const student = {

    name: "Akshay",

    address:{

        city:"Sangli",

        state:"Maharashtra",

        country:"India"

    }

};

console.log(student.address.city);SangliReal-World Example
Student

│

├── Name

├── Roll Number

└── Address

      │

      ├── City

      ├── State

      └── Country
Objects Containing Arrays
Objects can also store arrays.
Example
const student = {

    name:"Akshay",

    subjects:[

        "HTML",

        "CSS",

        "JavaScript"

    ]

};

console.log(student.subjects);["HTML","CSS","JavaScript"]Accessing Array Elements
console.log(student.subjects[1]);CSSObjects Inside Arrays
One of the most common data structures used in APIs and databases is an array of objects.
Example
const students = [

{

name:"Akshay",

marks:90

},

{

name:"Rahul",

marks:85

},

{

name:"Sneha",

marks:95

}

];

console.log(students);
Output
[
 {name:"Akshay",marks:90},
 {name:"Rahul",marks:85},
 {name:"Sneha",marks:95}
]
Accessing Individual Objects
console.log(students[0].name);

console.log(students[2].marks);
Output
Akshay

95
Why Arrays of Objects Are Important
Most REST APIs return data as arrays of objects.
Example:
[
{

"id":1,

"name":"Akshay",

"course":"JavaScript"

},

{

"id":2,

"name":"Rahul",

"course":"React"

}

]- Fetch API
- AJAX
- JSON
- Databases
- REST APIs
Best Practices
- Use meaningful property names.
- Keep object structures consistent.
- Group related information into nested objects.
- Prefer dot notation unless bracket notation is required.
- Avoid deeply nested objects unless necessary.
- Use methods to encapsulate behavior instead of writing separate functions.
Built-in Object Methods
JavaScript provides several built-in methods that make working with objects easier. These methods allow developers to retrieve object keys, values, entries, clone objects, freeze objects, seal objects, and perform many other operations efficiently.
The most commonly used object methods are:
Object.keys()Object.values()Object.entries()Object.assign()Object.freeze()Object.seal()hasOwnProperty()
These methods are extensively used in modern JavaScript applications, React, Vue.js, Angular, and Node.js.
Object.keys()
What is Object.keys()?
The Object.keys() method returns an array containing all the property names (keys) of an object.
Syntax
Object.keys(objectName);Example 1
const student = {

    name: "Akshay",

    age: 22,

    department: "Computer Science"

};

console.log(Object.keys(student));["name", "age", "department"]Explanation
Instead of manually writing each property name, Object.keys() automatically retrieves all keys from the object.
Example 2
const employee = {

    id: 101,

    name: "Rahul",

    salary: 65000

};

const keys = Object.keys(employee);

console.log(keys);["id", "name", "salary"]Real-World Example
Suppose an API returns user information.
const user = {

    id: 1,

    username: "akshay",

    email: "akshay@example.com"

};

console.log(Object.keys(user));
This helps developers dynamically generate tables or forms.
Object.values()
What is Object.values()?
The Object.values() method returns an array containing all property values.
Syntax
Object.values(objectName);Example
const student = {

    name: "Akshay",

    age: 22,

    city: "Sangli"

};

console.log(Object.values(student));["Akshay", 22, "Sangli"]Example 2
const car = {

    brand: "Toyota",

    model: "Innova",

    year: 2025

};

console.log(Object.values(car));["Toyota", "Innova", 2025]Object.entries()
What is Object.entries()?
The Object.entries() method returns an array of key-value pairs.
Each element is itself an array containing:
[Key, Value]Syntax
Object.entries(objectName);Example
const student = {

    name: "Akshay",

    age: 22,

    course: "JavaScript"

};

console.log(Object.entries(student));
Output
[
 ["name","Akshay"],
 ["age",22],
 ["course","JavaScript"]
]
Practical Example
const product = {

    id:101,

    name:"Laptop",

    price:55000

};

Object.entries(product).forEach(

([key,value])=>{

console.log(key+" : "+value);

});id : 101
name : Laptop
price : 55000Comparison of Object.keys(), Object.values(), and Object.entries()
| Method | Returns |
|---|---|
Object.keys() |
Array of property names |
Object.values() |
Array of property values |
Object.entries() |
Array of key-value pairs |
Iterating Through Objects
Objects are commonly traversed using the for...in loop.
Syntax
for(let key in object){

}
Example
const student = {

    name:"Akshay",

    age:22,

    department:"Computer Science"

};

for(let key in student){

console.log(key+" : "+student[key]);

}
Output
name : Akshay

age : 22

department : Computer Science
Explanation
The loop visits each property one by one.
hasOwnProperty()
What is hasOwnProperty()?
This method checks whether a property belongs directly to the object.
Syntax
object.hasOwnProperty(propertyName);Example
const student={

name:"Akshay",

age:22

};

console.log(

student.hasOwnProperty("name")

);

console.log(

student.hasOwnProperty("city")

);true
falseObject.assign()
What is Object.assign()?
Object.assign() copies properties from one or more objects into another object.
It is widely used for object cloning and merging.
Syntax
Object.assign(target, source);Example 1
const student = {

name:"Akshay",

age:22

};

const copy =

Object.assign({},student);

console.log(copy);{
name:"Akshay",
age:22
}Example 2: Merge Objects
const personal={

name:"Akshay"

};

const academic={

course:"B.Tech"

};

const student=

Object.assign(

{},

personal,

academic

);

console.log(student);{
name:"Akshay",
course:"B.Tech"
}Object.freeze()
What is Object.freeze()?
Object.freeze() prevents any modification to an object.
After freezing:
- No new properties can be added.
- Existing properties cannot be modified.
- Existing properties cannot be deleted.
Example
const student={

name:"Akshay"

};

Object.freeze(student);

student.name="Rahul";

console.log(student);{
name:"Akshay"
}Explanation
The object remains unchanged because it has been frozen.
Object.seal()
What is Object.seal()?
A sealed object allows modification of existing properties but prevents adding or deleting properties.
Example
const student={

name:"Akshay"

};

Object.seal(student);

student.name="Rahul";

student.city="Sangli";

console.log(student);{
name:"Rahul"
}Difference Between freeze() and seal()
Object.freeze() |
Object.seal() |
|---|---|
| Cannot modify existing properties | Existing properties can be modified |
| Cannot add new properties | Cannot add new properties |
| Cannot delete properties | Cannot delete properties |
| Completely immutable | Partially mutable |
Object Destructuring
What is Object Destructuring?
Object destructuring extracts object properties into separate variables.
Introduced in ES6, it makes code cleaner and more readable.
Traditional Approach
const student={

name:"Akshay",

age:22

};

let name=student.name;

let age=student.age;

console.log(name);

console.log(age);
Using Destructuring
const student={

name:"Akshay",

age:22

};

const {name,age}=student;

console.log(name);

console.log(age);Akshay
22Renaming Variables
const student={

name:"Akshay",

department:"IT"

};

const {

name:studentName,

department:dept

}=student;

console.log(studentName);

console.log(dept);Akshay
ITShallow Copy vs Reference Copy
Reference Copy
const student1={

name:"Akshay"

};

const student2=student1;

student2.name="Rahul";

console.log(student1.name);RahulExplanation
Both variables refer to the same object in memory.
Shallow Copy
const student1={

name:"Akshay"

};

const student2=

Object.assign({},student1);

student2.name="Rahul";

console.log(student1.name);

console.log(student2.name);Akshay
RahulObject Memory Representation
student1
│
▼
┌───────────────┐
│ name: Akshay │
└───────────────┘
▲
│
student2student1
│
▼
┌───────────────┐
│ name: Akshay │
└───────────────┘
student2
│
▼
┌───────────────┐
│ name: Rahul │
└───────────────┘Best Practices
- Use object literals for simple objects.
- Prefer
Object.keys(),Object.values(), andObject.entries()over manual iteration. - Use object destructuring to improve readability.
- Use
Object.freeze()for constants and configuration objects. - Use
Object.seal()when updates are allowed but structure should remain fixed. - Avoid unnecessary deep nesting.
- Clone objects before modifying shared data.
Common Mistakes
- Confusing object references with object copies.
- Modifying frozen objects.
- Assuming
Object.assign()creates a deep copy. - Using
for...inwithout checking inherited properties. - Forgetting that object property names are case-sensitive.
Quick Revision
| Method | Purpose |
|---|---|
Object.keys() |
Returns property names |
Object.values() |
Returns property values |
Object.entries() |
Returns key-value pairs |
Object.assign() |
Copies or merges objects |
Object.freeze() |
Makes an object immutable |
Object.seal() |
Prevents adding/deleting properties |
hasOwnProperty() |
Checks whether a property exists directly on the object |
ontinue immediately after the previous section.
Constructor Functions in JavaScript
What is a Constructor Function?
A Constructor Function is a special type of function used to create multiple objects with the same structure and behavior.
Instead of writing the same object repeatedly, a constructor function acts as a blueprint for creating objects.
Before ES6 introduced Classes, constructor functions were the primary way to implement Object-Oriented Programming in JavaScript.
Why Use Constructor Functions?
Consider creating information for multiple students.
Without constructor functions, you might write:
const student1 = {
name: "Akshay",
rollNo: 101,
course: "Computer Science"
};
const student2 = {
name: "Rahul",
rollNo: 102,
course: "Computer Science"
};
const student3 = {
name: "Sneha",
rollNo: 103,
course: "Computer Science"
};Instead, use a constructor function.
Student Constructor
│
├── Student 1
├── Student 2
├── Student 3
├── Student 4
└── Student nAdvantages of Constructor Functions
- Avoid code duplication.
- Improve code readability.
- Create unlimited objects.
- Easier maintenance.
- Foundation for Object-Oriented Programming.
Naming Convention
Constructor function names generally begin with a capital letter.
Example:
function Student(){
}Syntax
function Student(name, rollNo){
this.name = name;
this.rollNo = rollNo;
}Understanding the new Keyword
The new keyword creates an object from a constructor function.
When new is used:
- A new empty object is created.
thisrefers to the newly created object.- Properties are assigned.
- The object is returned automatically.
Execution Flow
new Student()
│
▼
Create Empty Object
│
▼
Assign Properties
│
▼
Return ObjectExample 1: Student Constructor
function Student(name, rollNo){
this.name = name;
this.rollNo = rollNo;
}
const student1 = new Student("Akshay",101);
console.log(student1);Student {
name: "Akshay",
rollNo: 101
}Explanation
The constructor creates an object and stores the provided values.
Example 2: Creating Multiple Objects
function Student(name, rollNo){
this.name = name;
this.rollNo = rollNo;
}
const student1 = new Student("Akshay",101);
const student2 = new Student("Rahul",102);
const student3 = new Student("Sneha",103);
console.log(student1);
console.log(student2);
console.log(student3);Student {name:"Akshay", rollNo:101}
Student {name:"Rahul", rollNo:102}
Student {name:"Sneha", rollNo:103}Real-World Example
Imagine a college ERP system.
Student Constructor
│
├── Akshay
├── Rahul
├── Sneha
├── Priya
└── AmitAdding Methods to Constructor Functions
Methods can also be created inside constructor functions.
Example
function Student(name, marks){
this.name = name;
this.marks = marks;
this.display = function(){
console.log(this.name);
console.log(this.marks);
};
}
const student = new Student("Akshay",90);
student.display();Akshay
90Explanation
Every object created from the constructor contains its own display() method.
Example: Employee Constructor
function Employee(name, salary){
this.name = name;
this.salary = salary;
this.increment = function(){
this.salary += 5000;
};
}
const emp = new Employee("Rahul",50000);
emp.increment();
console.log(emp.salary);Output
55000Constructor with Multiple Methods
function BankAccount(holder,balance){
this.holder = holder;
this.balance = balance;
this.deposit = function(amount){
this.balance += amount;
};
this.withdraw = function(amount){
this.balance -= amount;
};
}
const account =
new BankAccount("Akshay",10000);
account.deposit(5000);
account.withdraw(2000);
console.log(account.balance);Output
13000Constructor vs Object Literal
| Object Literal | Constructor Function |
|---|---|
| Creates one object | Creates multiple objects |
| Simple syntax | Reusable blueprint |
| Suitable for small applications | Suitable for medium and large applications |
| Code duplication possible | Eliminates duplication |
| Less scalable | Highly scalable |
What Happens Internally?
When JavaScript executes:
const student = new Student("Akshay",101);// Step 1
const student = {};
// Step 2
student.name = "Akshay";
student.rollNo = 101;
// Step 3
return student;new keyword performs these steps automatically.Forgetting the new Keyword
One of the most common beginner mistakes is forgetting new.
Incorrect Code
function Student(name){
this.name = name;
}
const student = Student("Akshay");TypeError (in strict mode)
or
Unexpected behaviorCorrect Code
const student = new Student("Akshay");Constructor Property
Every object contains a constructor property.
Example
function Student(name){
this.name = name;
}
const student =
new Student("Akshay");
console.log(student.constructor);function Student(){ ... }Checking Object Type
Use the instanceof operator.
Syntax
object instanceof ConstructorExample
function Student(name){
this.name = name;
}
const student =
new Student("Akshay");
console.log(
student instanceof Student
);trueExample 2
function Employee(name){
this.name = name;
}
const emp =
new Employee("Rahul");
console.log(
emp instanceof Employee
);
console.log(
emp instanceof Object
);true
trueFactory Functions
What is a Factory Function?
A Factory Function creates and returns objects without using the new keyword.
Unlike constructor functions, factory functions explicitly return an object.
Syntax
function createObject(){
return {};
}Example
function createStudent(name, rollNo){
return{
name,
rollNo
};
}
const student1 =
createStudent("Akshay",101);
console.log(student1);{
name:"Akshay",
rollNo:101
}Constructor Function vs Factory Function
| Constructor Function | Factory Function |
|---|---|
Uses new keyword |
Does not use new |
Uses this |
Returns an object explicitly |
| Naming convention starts with capital letter | Normal function naming |
| Common before ES6 | Still widely used in modern JavaScript |
Real-World Comparison
Imagine a car manufacturing company.
Constructor Function
Car Factory Blueprint
│
▼
Create Cars
Car 1
Car 2
Car 3The blueprint is reused to manufacture multiple cars.
Factory Function
Customer Request
│
▼
Build Car
│
▼
Return Completed CarBest Practices
- Use constructor functions when creating many similar objects.
- Always begin constructor names with a capital letter.
- Never forget the
newkeyword. - Use
instanceofto verify object types. - Prefer factory functions when object creation logic is simple.
- Keep constructor functions focused on initialization only.
Common Mistakes
- Forgetting the
newkeyword. - Writing constructor names in lowercase.
- Adding large amounts of business logic inside constructors.
- Creating unnecessary duplicate methods for every object.
- Confusing constructor functions with factory functions.
Quick Revision
| Concept | Purpose |
|---|---|
| Constructor Function | Blueprint for creating objects |
new |
Creates a new object |
this |
Refers to the current object |
instanceof |
Checks object type |
| Factory Function | Creates objects without new |
ES6 Classes in JavaScript
What is an ES6 Class?
JavaScript introduced Classes in ECMAScript 2015 (ES6) to make Object-Oriented Programming easier and more readable.
A class acts as a blueprint for creating objects. Instead of repeatedly writing object literals or constructor functions, developers define a class once and create multiple objects from it.
Although JavaScript classes look similar to classes in Java, C++, or C#, they are built on JavaScript’s prototype-based inheritance.
Why Were Classes Introduced?
Before ES6, developers used constructor functions to create objects.
Example:
function Student(name, age) {
this.name = name;
this.age = age;
}ES6 classes provide cleaner and more organized syntax.
class Student {
constructor(name, age){
this.name = name;
this.age = age;
}
}Advantages of ES6 Classes
- Cleaner syntax
- Easier to understand
- Better code organization
- Supports inheritance
- Supports encapsulation
- Easier maintenance
- Used by React, Angular, Vue.js, and Node.js
Class Terminology
| Term | Description |
|---|---|
| Class | Blueprint for creating objects |
| Object | Instance of a class |
| Constructor | Special method used for initialization |
| Property | Variable inside an object |
| Method | Function inside a class |
| Instance | Object created from a class |
Real-World Example
Consider a college management system.
Student Class
│
├── Student 1
├── Student 2
├── Student 3
├── Student 4
└── Student nEach student object stores its own information.
Syntax of a Class
class ClassName{
constructor(){
}
}Example 1: Empty Class
class Student{
}
const student1 = new Student();
console.log(student1);Student {}Explanation
An empty object of type Student has been created.
Constructor Method
What is a Constructor?
The constructor() is a special method that executes automatically whenever a new object is created.
Its primary purpose is to initialize object properties.
Syntax
class Student{
constructor(name){
this.name = name;
}
}Example 2: Constructor Initialization
class Student{
constructor(name, rollNo){
this.name = name;
this.rollNo = rollNo;
}
}
const student =
new Student("Akshay",101);
console.log(student);Student {
name: "Akshay",
rollNo: 101
}Explanation
When the object is created:
new Student("Akshay",101);Creating Multiple Objects
One class can create any number of objects.
Example
class Student{
constructor(name, marks){
this.name = name;
this.marks = marks;
}
}
const student1 = new Student("Akshay",90);
const student2 = new Student("Rahul",80);
const student3 = new Student("Sneha",95);
console.log(student1);
console.log(student2);
console.log(student3);Student {name:"Akshay", marks:90}
Student {name:"Rahul", marks:80}
Student {name:"Sneha", marks:95}Instance Properties
Each object has its own copy of the properties.
Example
class Employee{
constructor(name, salary){
this.name = name;
this.salary = salary;
}
}
const emp1 =
new Employee("Rahul",50000);
const emp2 =
new Employee("Sneha",65000);
console.log(emp1.salary);
console.log(emp2.salary);50000
65000Class Methods
Methods define the behavior of an object.
Syntax
class Student{
display(){
}
}Example 1
class Student{
constructor(name){
this.name = name;
}
display(){
console.log(this.name);
}
}
const student =
new Student("Akshay");
student.display();AkshayExample 2
class Calculator{
add(a,b){
return a+b;
}
}
const calc =
new Calculator();
console.log(
calc.add(20,10)
);30Example 3: Student Result
class Student{
constructor(name, marks){
this.name = name;
this.marks = marks;
}
display(){
console.log(this.name);
console.log(this.marks);
}
result(){
if(this.marks>=40)
console.log("Pass");
else
console.log("Fail");
}
}
const student =
new Student("Akshay",75);
student.display();
student.result();Akshay
75
PassMultiple Methods
A class can contain any number of methods.
Example
class BankAccount{
constructor(name,balance){
this.name=name;
this.balance=balance;
}
deposit(amount){
this.balance+=amount;
}
withdraw(amount){
this.balance-=amount;
}
display(){
console.log(this.balance);
}
}
const account=
new BankAccount(
"Akshay",
10000
);
account.deposit(5000);
account.withdraw(2000);
account.display();13000Understanding the this Keyword in Classes
Inside a class, this refers to the current object.
Example
class Mobile{
constructor(brand){
this.brand=brand;
}
display(){
console.log(this.brand);
}
}
const phone=
new Mobile("Samsung");
phone.display();SamsungStatic Methods
What is a Static Method?
Static methods belong to the class itself rather than individual objects.
They are called using the class name.
Syntax
class ClassName{
static methodName(){
}
}Example 1
class MathUtility{
static square(number){
return number*number;
}
}
console.log(
MathUtility.square(8)
);64Example 2
class College{
static collegeName(){
console.log(
"Rajarambapu Institute of Technology"
);
}
}
College.collegeName();Rajarambapu Institute of TechnologyStatic Method vs Instance Method
| Static Method | Instance Method |
|---|---|
| Called using class name | Called using object |
| Shared by all objects | Belongs to each object |
| No object required | Requires an object |
| Used for utility functions | Used for object behavior |
Getters
What is a Getter?
A getter retrieves the value of an object property as if it were a property instead of a method call.
Syntax
get propertyName(){
}Example
class Student{
constructor(name){
this._name=name;
}
get name(){
return this._name;
}
}
const student=
new Student("Akshay");
console.log(student.name);AkshaySetters
What is a Setter?
A setter updates or validates the value of a property before assigning it.
Syntax
set propertyName(value){
}Example
class Student{
constructor(name){
this._name=name;
}
set name(value){
this._name=value;
}
}
const student=
new Student("Akshay");
student.name="Rahul";
console.log(student.name);RahulCombining Getters and Setters
class Employee{
constructor(name){
this._name=name;
}
get name(){
return this._name;
}
set name(value){
if(value.length<3){
console.log("Invalid Name");
return;
}
this._name=value;
}
}
const emp=
new Employee("Akshay");
emp.name="Ra";
console.log(emp.name);
emp.name="Rahul";
console.log(emp.name);Output
Invalid Name
Akshay

RahulConstructor Function vs ES6 Class
| Constructor Function | ES6 Class |
|---|---|
Uses function keyword |
Uses class keyword |
| Less readable | More readable |
| Methods defined manually | Cleaner method syntax |
| Prototype manipulation required | Built-in support |
| Older JavaScript approach | Modern JavaScript approach |
Class Lifecycle
Create Class
      │
      ▼
Create Object using new
      │
      ▼
Constructor Executes
      │
      ▼
Properties Initialized
      │
      ▼
Methods Become Available
      │
      ▼
Object Ready to Use
Best Practices
- Use PascalCase for class names (
Student,Employee,BankAccount). - Keep classes focused on a single responsibility.
- Initialize all required properties in the constructor.
- Use getters and setters for validation when appropriate.
- Use static methods only for functionality that doesn’t depend on object state.
- Prefer ES6 classes over constructor functions in modern applications.
Common Mistakes
- Forgetting the
newkeyword when creating an object. - Accessing static methods through an object instead of the class.
- Using
thisincorrectly inside callbacks. - Writing excessively large classes with unrelated responsibilities.
- Confusing instance properties with static properties.
Quick Revision
| Concept | Purpose |
|---|---|
class |
Blueprint for creating objects |
constructor() |
Initializes object properties |
new |
Creates an object |
| Instance Method | Operates on object data |
| Static Method | Belongs to the class |
| Getter | Retrieves a property value |
| Setter | Updates or validates a property |
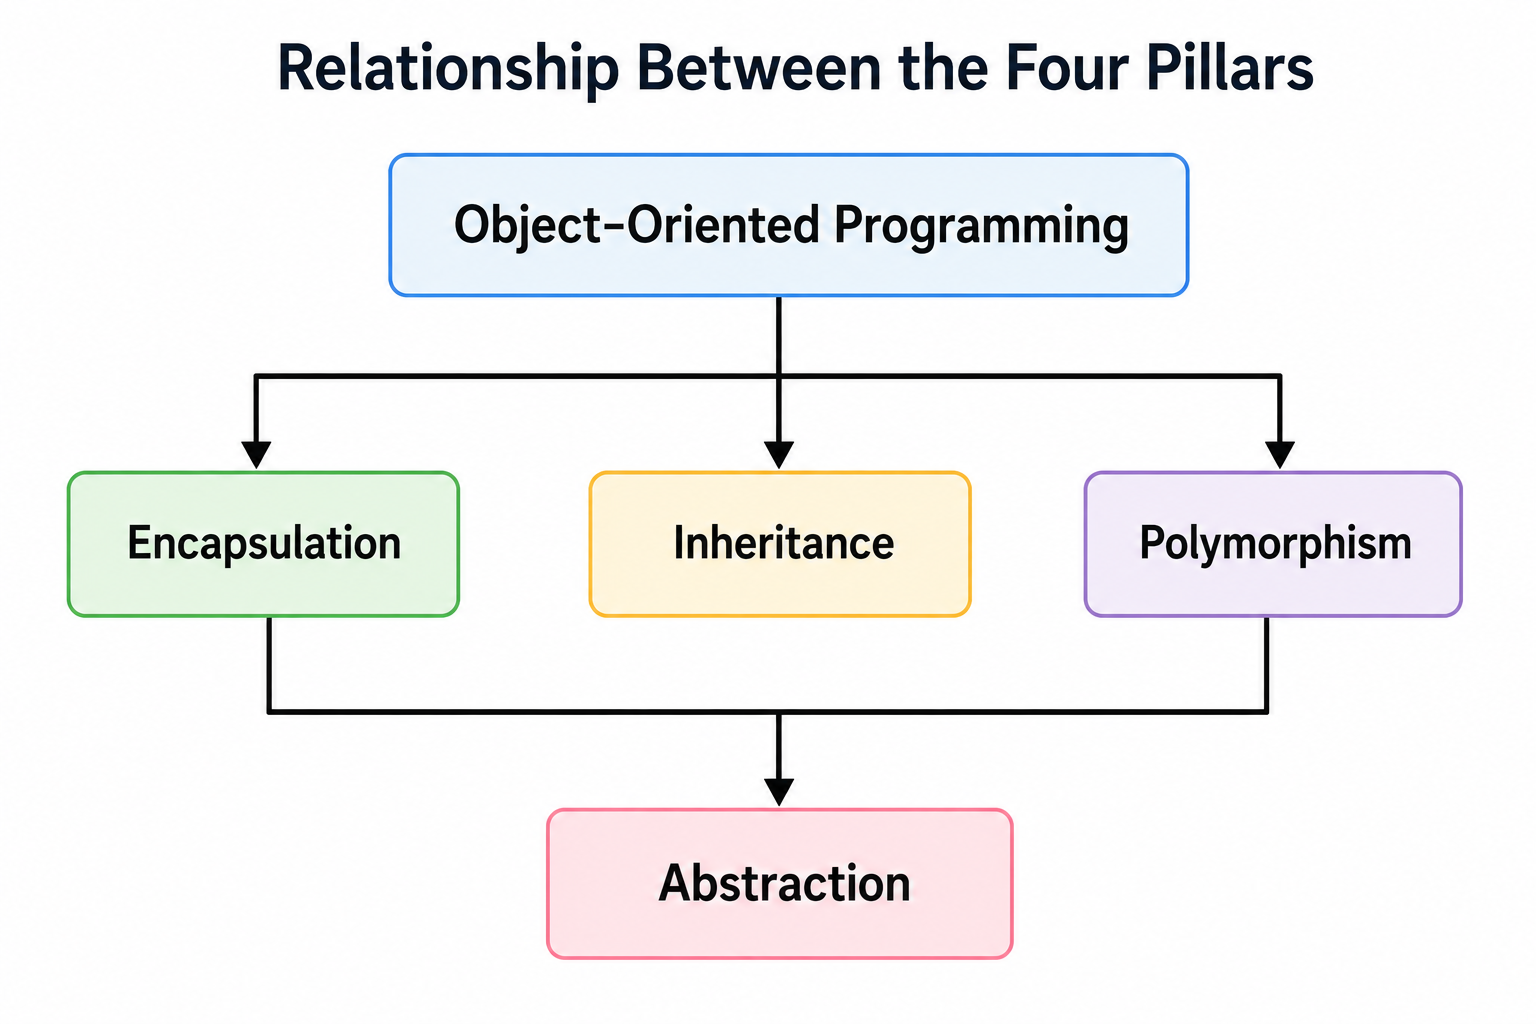
The Four Pillars of Object-Oriented Programming
Object-Oriented Programming is built upon four fundamental principles known as the Four Pillars of OOP. These principles help developers create software that is reusable, maintainable, secure, and scalable.
The four pillars are:
- Encapsulation
- Inheritance
- Polymorphism
- Abstraction
These concepts work together to organize code efficiently and reduce duplication.
Relationship Between the Four Pillars
1. Encapsulation
What is Encapsulation?
Encapsulation is the process of combining data (properties) and methods (functions) into a single unit while restricting direct access to sensitive data.
In simple words,
Encapsulation means hiding data and allowing controlled access through methods.
It protects object data from unauthorized modification.
Real-World Analogy
Consider an ATM Machine.
ATM Machine

│

├── Account Number

├── Balance

├── PIN

│

├── Deposit()

├── Withdraw()

└── CheckBalance()They must use the available operations.
This is encapsulation.
Why is Encapsulation Important?
Encapsulation provides:
- Data protection
- Better security
- Controlled access
- Improved maintainability
- Easier debugging
Without Encapsulation
class BankAccount{

    constructor(){

        this.balance = 5000;

    }

}

const account = new BankAccount();

account.balance = -100000;

console.log(account.balance);-100000Problem
The balance becomes invalid because anyone can modify it.
Using Encapsulation with Private Fields
Modern JavaScript supports Private Fields using the # symbol.
Syntax
class ClassName{

    #propertyName;

}
Example 1
class BankAccount{

    #balance;

    constructor(balance){

        this.#balance = balance;

    }

    showBalance(){

        console.log(this.#balance);

    }

}

const account =

new BankAccount(10000);

account.showBalance();10000Attempting Direct Access
console.log(account.#balance);SyntaxError
Private field '#balance'
must be declared in an enclosing classExplanation
Private fields cannot be accessed from outside the class.
Only class methods can access them.
Example 2
class Student{

    #marks;

    constructor(marks){

        this.#marks = marks;

    }

    getMarks(){

        return this.#marks;

    }

}

const student =

new Student(95);

console.log(

student.getMarks()

);
Output
95Example 3
class Employee{

    #salary;

    constructor(salary){

        this.#salary = salary;

    }

    increment(){

        this.#salary += 5000;

    }

    display(){

        console.log(this.#salary);

    }

}

const emp =

new Employee(50000);

emp.increment();

emp.display();55000Benefits of Encapsulation
- Protects sensitive data
- Prevents accidental modification
- Improves security
- Improves maintainability
- Simplifies debugging
2. Inheritance
What is Inheritance?
Inheritance allows one class to acquire the properties and methods of another class.
Instead of rewriting the same code, a child class reuses the functionality of its parent class.
Real-World Analogy
Vehicle

│

├── Engine

├── Speed

└── Start()

        │

────────┼────────

│                │

▼                ▼

Car            Bike
Both Car and Bike inherit common features from Vehicle.
Why Use Inheritance?
Inheritance provides:
- Code reuse
- Reduced duplication
- Easier maintenance
- Hierarchical organization
Syntax
class Parent{

}

class Child extends Parent{

}
Example 1
class Animal{

    eat(){

        console.log("Eating");

    }

}

class Dog extends Animal{

}

const dog =

new Dog();

dog.eat();EatingExplanation
The Dog class automatically inherits the eat() method.
Example 2
class Vehicle{

    start(){

        console.log("Vehicle Started");

    }

}

class Car extends Vehicle{

}

const car =

new Car();

car.start();Vehicle StartedThe super() Keyword
super() calls the constructor of the parent class.
Example
class Person{

    constructor(name){

        this.name = name;

    }

}

class Student extends Person{

    constructor(name,course){

        super(name);

        this.course = course;

    }

}

const student =

new Student(

"Akshay",

"JavaScript"

);

console.log(student);Student{
name:"Akshay",
course:"JavaScript"
}Multi-Level Inheritance
Person

│

▼

Employee

│

▼

Manager
Example
class Person{

    speak(){

        console.log("Speaking");

    }

}

class Employee extends Person{

}

class Manager extends Employee{

}

const manager=

new Manager();

manager.speak();Speaking3. Polymorphism
What is Polymorphism?
The word Polymorphism means
One Interface, Multiple Forms
Different classes can define the same method in different ways.
Real-World Analogy
Shape

│

├── draw()

│

├── Circle

├── Rectangle

└── Triangle
Each shape implements its own version of draw().
Example 1
class Animal{

    sound(){

        console.log("Animal Sound");

    }

}

class Dog extends Animal{

    sound(){

        console.log("Dog Barks");

    }

}

const dog=

new Dog();

dog.sound();Dog BarksExample 2
class Bird{

    fly(){

        console.log("Bird Flying");

    }

}

class Eagle extends Bird{

    fly(){

        console.log("Eagle Flying High");

    }

}

const eagle=

new Eagle();

eagle.fly();Eagle Flying HighMethod Overriding
Polymorphism is achieved through Method Overriding.
The child class replaces the implementation of the parent class.
Example
class Shape{

    area(){

        console.log("Area");

    }

}

class Circle extends Shape{

    area(){

        console.log("πr²");

    }

}

const circle=

new Circle();

circle.area();
Output
πr²Benefits of Polymorphism
- Flexibility
- Extensibility
- Easier maintenance
- Better code organization
4. Abstraction
What is Abstraction?
Abstraction means hiding implementation details and exposing only the essential functionality.
Users know what an object does but not necessarily how it does it.
Real-World Analogy
A television remote has buttons such as:
Power

Volume

ChannelExample
class CoffeeMachine{

    makeCoffee(){

        this.#boilWater();

        console.log("Coffee Ready");

    }

    #boilWater(){

        console.log("Boiling Water");

    }

}

const coffee=

new CoffeeMachine();

coffee.makeCoffee();Boiling Water
Coffee ReadyExplanation
The private method #boilWater() is hidden from the user.
Only makeCoffee() is exposed.
Comparison of the Four Pillars
| Pillar | Purpose | Example |
|---|---|---|
| Encapsulation | Protect data | Private fields |
| Inheritance | Reuse code | extends |
| Polymorphism | Same method, different behavior | Method overriding |
| Abstraction | Hide implementation | Private methods |
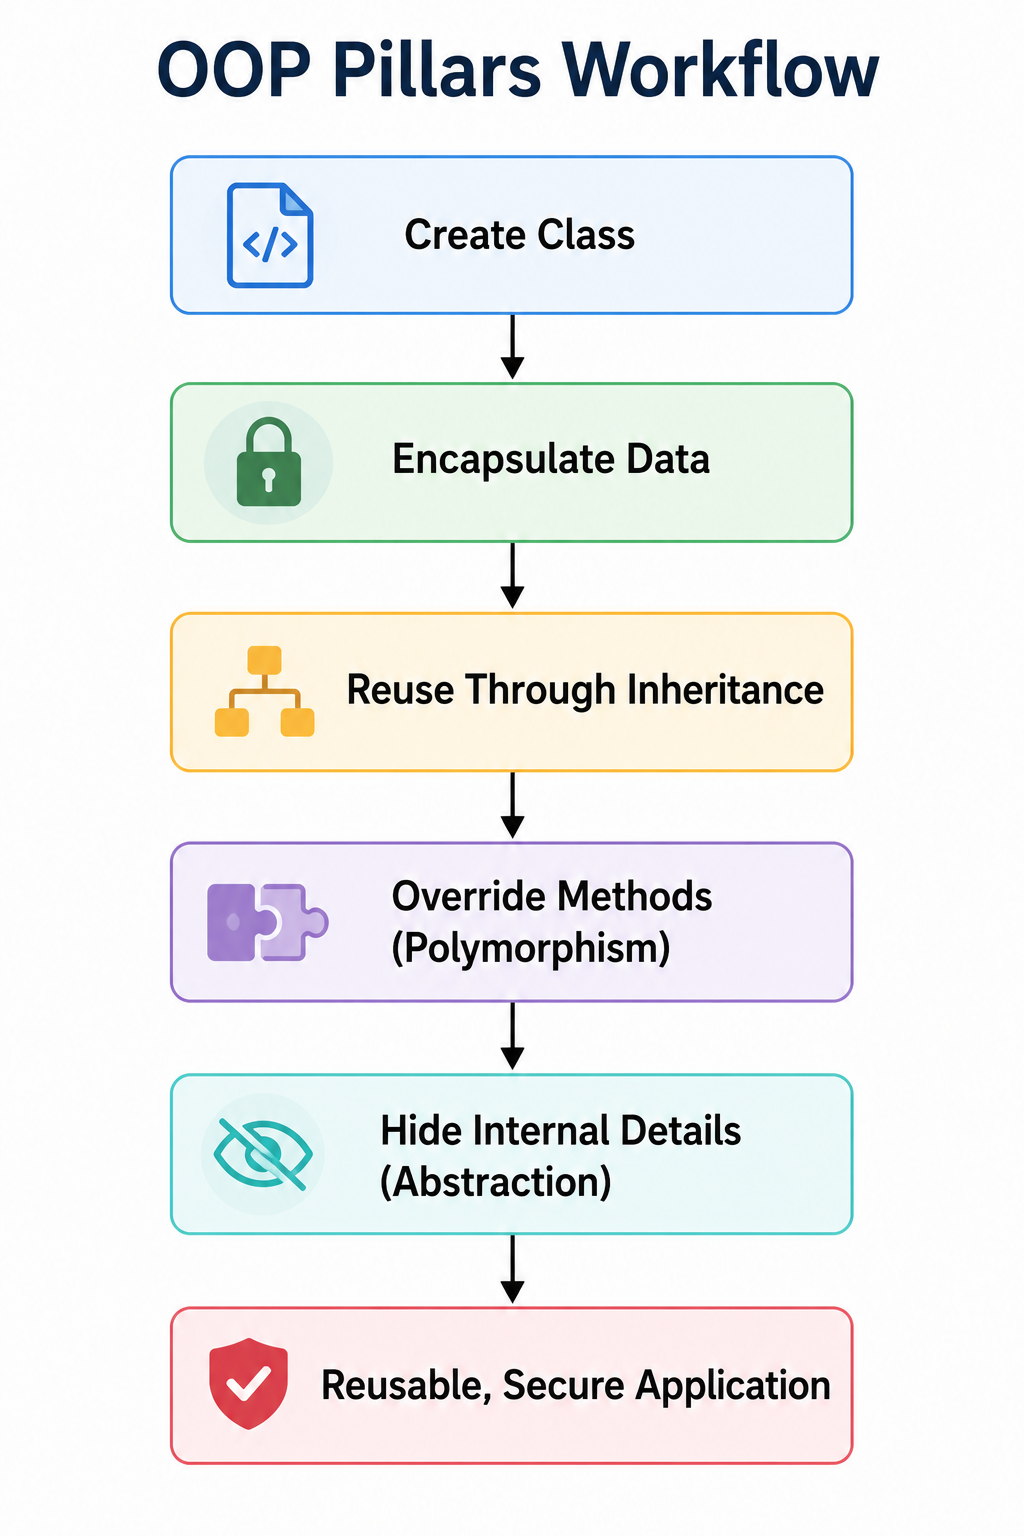
OOP Pillars Workflow
Best Practices
- Keep data private whenever possible.
- Use inheritance only when there is a true “is-a” relationship (for example, a
Caris aVehicle). - Avoid deep inheritance hierarchies that become difficult to maintain.
- Override methods only when behavior genuinely differs.
- Expose only the functionality users need, keeping implementation details hidden.
- Favor composition over inheritance when inheritance is not the best fit.
Common Mistakes
- Making every property public.
- Using inheritance simply to reuse code, even when there is no logical relationship.
- Overriding methods without preserving expected behavior.
- Exposing private implementation details.
- Creating unnecessarily complex class hierarchies.
Quick Revision
| Concept | Key Idea |
|---|---|
| Encapsulation | Bundle data and methods while protecting data |
| Inheritance | Reuse properties and methods from another class |
| Polymorphism | One interface with multiple implementations |
| Abstraction | Hide internal implementation and expose essential functionality |
Advanced Object-Oriented Programming Concepts in JavaScript
Modern JavaScript provides several advanced features that make Object-Oriented Programming more powerful, maintainable, and secure.
In this section, you will learn about:
- Public Fields
- Private Fields
- Private Methods
- Static Properties
- Static Methods
- Method Chaining
- Composition
- Composition vs Inheritance
- JavaScript Modules
- Import and Export
- Immutable Objects
- Object.freeze()
- Object.seal()
- Object.preventExtensions()
These concepts are widely used in enterprise applications and modern JavaScript frameworks.
Public Fields
What are Public Fields?
A Public Field is a property that can be accessed and modified from anywhere in the application.
By default, every object property in JavaScript is public.
Syntax
class Student{

    name;

}
Example 1
class Student{

    name = "Akshay";

    course = "JavaScript";

}

const student = new Student();

console.log(student.name);

console.log(student.course);Akshay
JavaScriptExample 2
class Employee{

    name = "Rahul";

}

const emp = new Employee();

emp.name = "Sneha";

console.log(emp.name);SnehaExplanation
Public fields can be read and modified from outside the class.
Private Fields
What are Private Fields?
Private fields are accessible only inside the class.
They cannot be accessed directly from outside.
Private fields begin with the # symbol.
Syntax
class Student{

    #marks;

}
Example
class Student{

    #marks = 95;

    display(){

        console.log(this.#marks);

    }

}

const student = new Student();

student.display();95Invalid Access
console.log(student.#marks);SyntaxErrorPublic Fields vs Private Fields
| Public Fields | Private Fields |
|---|---|
| Accessible everywhere | Accessible only inside class |
| Less secure | More secure |
| Can be modified externally | Cannot be modified directly |
| Suitable for general information | Suitable for sensitive data |
Private Methods
What are Private Methods?
Private methods are helper methods that cannot be called outside the class.
They are useful for hiding internal implementation.
Syntax
#methodName(){

}
Example
class ATM{

    withdraw(){

        this.#verifyPIN();

        console.log("Cash Withdrawn");

    }

    #verifyPIN(){

        console.log("PIN Verified");

    }

}

const atm = new ATM();

atm.withdraw();PIN Verified
Cash WithdrawnInvalid Access
atm.#verifyPIN();SyntaxErrorWhy Use Private Methods?
Private methods:
- Improve security
- Hide implementation
- Prevent accidental misuse
- Reduce code complexity
Static Properties
What are Static Properties?
Static properties belong to the class itself instead of individual objects.
Every object shares the same static property.
Example
class College{

    static collegeName =

    "Rajarambapu Institute of Technology";

}

console.log(

College.collegeName

);Rajarambapu Institute of TechnologyStatic Methods
You already learned static methods earlier.
Let’s understand where they are useful.
Example
class Calculator{

    static square(number){

        return number * number;

    }

}

console.log(

Calculator.square(9)

);81Static Property vs Static Method
| Static Property | Static Method |
|---|---|
| Stores shared data | Performs shared operations |
| Accessed using class name | Called using class name |
| One copy per class | One method shared by all objects |
Method Chaining
What is Method Chaining?
Method chaining allows multiple methods to be called one after another using a single object.
Each method returns the object itself using the return this statement.
Without Method Chaining
account.deposit(500);

account.withdraw(200);

account.showBalance();
With Method Chaining
account

.deposit(500)

.withdraw(200)

.showBalance();
Example
class BankAccount{

    constructor(balance){

        this.balance = balance;

    }

    deposit(amount){

        this.balance += amount;

        return this;

    }

    withdraw(amount){

        this.balance -= amount;

        return this;

    }

    display(){

        console.log(this.balance);

        return this;

    }

}

const account =

new BankAccount(1000);

account

.deposit(500)

.withdraw(200)

.display();1300Advantages
- Cleaner code
- Better readability
- Fluent interface
- Less repetitive code
Composition
What is Composition?
Composition is a design technique where one object contains another object instead of inheriting from it.
It represents a has-a relationship.
Real-World Example
Car

│

├── Engine

├── Battery

├── Tyres

└── Steering
A Car has an Engine.
A Car is not an Engine.
Example
class Engine{

    start(){

        console.log("Engine Started");

    }

}

class Car{

    constructor(){

        this.engine = new Engine();

    }

    drive(){

        this.engine.start();

        console.log("Car Moving");

    }

}

const car = new Car();

car.drive();Engine Started
Car MovingInheritance vs Composition
| Inheritance | Composition |
|---|---|
| “is-a” relationship | “has-a” relationship |
| Uses extends | Uses object instances |
| Strong coupling | Loose coupling |
| Less flexible | More flexible |
| Suitable for hierarchy | Suitable for modular design |
When to Use Composition?
Use composition when:
- One object contains another object.
- Objects work together.
- Code reuse is needed without inheritance.
- Flexibility is important.
Modern frameworks often favor composition over deep inheritance.
JavaScript Modules
What are Modules?
A module is a JavaScript file that contains reusable code.
Modules help organize applications into smaller, manageable files.
Benefits of Modules
- Reusability
- Better organization
- Easier maintenance
- Separation of concerns
- Improved scalability
Exporting a Module
Named Export
math.js
export function add(a,b){

    return a+b;

}

export function multiply(a,b){

    return a*b;

}
Importing a Module
app.js
import {

add,

multiply

}

from "./math.js";

console.log(

add(10,20)

);

console.log(

multiply(5,6)

);30
30Default Export
student.js
export default class Student{

    constructor(name){

        this.name = name;

    }

}
Import Default Module
import Student

from "./student.js";

const student =

new Student("Akshay");

console.log(student.name);
Output
AkshayNamed Export vs Default Export
| Named Export | Default Export |
|---|---|
| Multiple exports allowed | One default export |
| Imported using braces | Imported without braces |
| Export specific members | Export entire object or class |
Object.preventExtensions()
What is Object.preventExtensions()?
It prevents new properties from being added to an object.
Existing properties can still be modified or deleted.
Example
const student = {

name:"Akshay"

};

Object.preventExtensions(student);

student.city="Sangli";

console.log(student);{
name:"Akshay"
}Comparison of Object.freeze(), Object.seal(), and Object.preventExtensions()
| Feature | preventExtensions() | seal() | freeze() |
|---|---|---|---|
| Add Properties | No | No | No |
| Delete Properties | Yes | No | No |
| Modify Existing Properties | Yes | Yes | No |
Immutable Objects
An immutable object cannot be modified after creation.
This improves:
- Predictability
- Security
- Reliability
Example:
const config = {

appName:"Student Portal",

version:"1.0"

};

Object.freeze(config);
Best Practices
- Use private fields for sensitive data.
- Keep classes focused on a single responsibility.
- Use method chaining only when it improves readability.
- Prefer composition over unnecessary inheritance.
- Organize large applications using ES Modules.
- Freeze configuration objects to prevent accidental changes.
- Use static methods for utility functions.
- Keep modules small and reusable.
Common Mistakes
- Overusing inheritance when composition is more appropriate.
- Accessing private fields directly.
- Forgetting to export modules.
- Mixing business logic and UI logic in the same class.
- Using static methods to access instance properties.
- Creating very large modules with unrelated functionality.
Quick Revision
| Concept | Purpose |
|---|---|
| Public Fields | Accessible everywhere |
| Private Fields | Accessible only inside the class |
| Private Methods | Hide internal implementation |
| Static Properties | Shared data across all objects |
| Method Chaining | Call multiple methods fluently |
| Composition | “Has-a” relationship |
| Modules | Organize reusable code |
| Named Export | Export multiple members |
| Default Export | Export one primary member |
| Object.preventExtensions() | Prevent adding new properties |
Practical Project 1: Library Management System Using JavaScript OOP
Practical Project 2: Student Management System Using JavaScript OOP
Practical Project 3: Bank Account Management System Using JavaScript OOP
Practical Project 4: Employee Payroll Management System Using JavaScript OOP
Summary
Throughout this tutorial, you learned how to design applications using Object-Oriented Programming in JavaScript, beginning with objects and constructor functions, progressing to ES6 classes, and then applying the four pillars of OOP—encapsulation, inheritance, polymorphism, and abstraction. You also explored advanced concepts such as private fields, getters and setters, static members, composition, method chaining, and JavaScript modules.
The four practical projects—Library Management System, Student Management System, Bank Account Management System, and Employee Payroll Management System—demonstrated how these concepts work together in realistic applications. By completing these projects, you have built a strong foundation for developing scalable JavaScript applications and are well prepared to work with modern frameworks such as React, Angular, Vue.js, and Node.js.